
FT8 / FT4 overview
The FT8 tab of the RemoteTx client is a complete FT8 and FT4 station in your browser, laid out and operated like WSJT-X. It decodes the radio's receive audio, sends your transmissions back over the same audio link, and switches the radio between receive and transmit and sets its frequency through the RemoteTx radio connection.
You don't need WSJT-X, virtual audio cables or CAT software on your computer. Everything runs in the page.
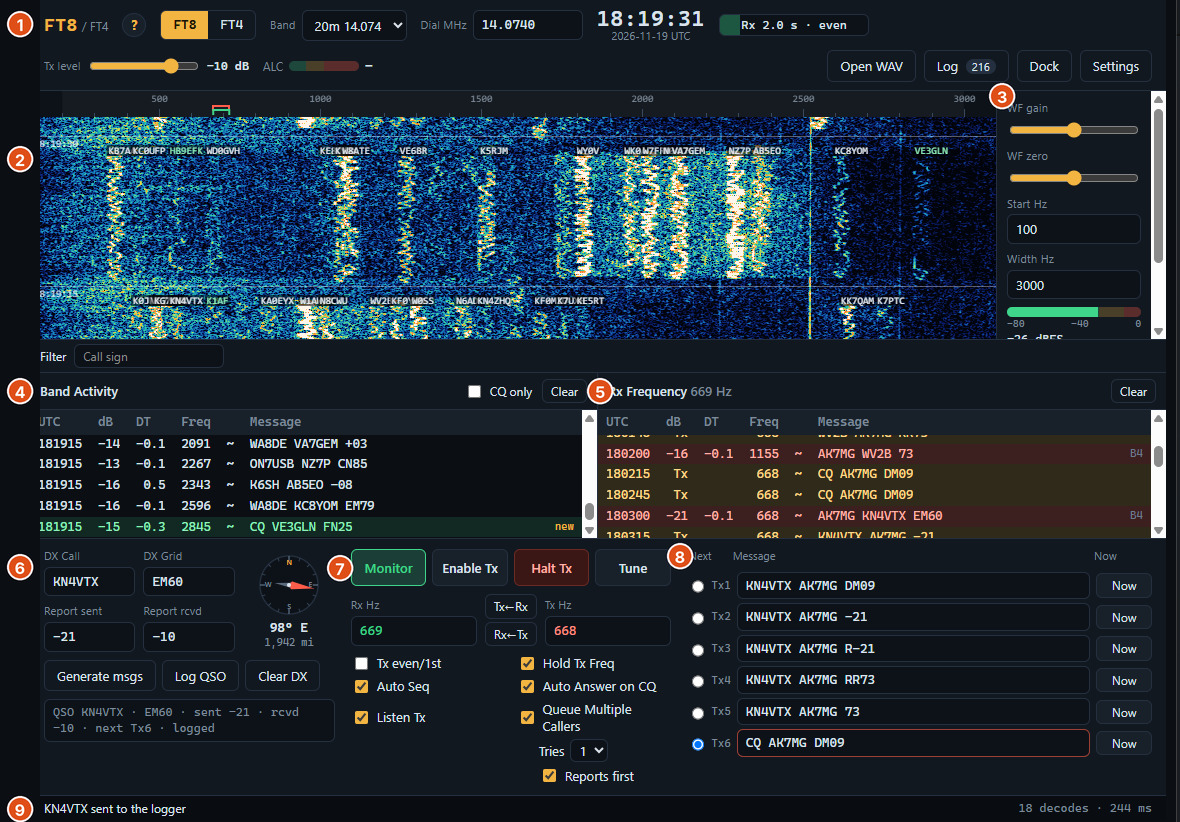
How it works#
| Part | What it does |
|---|---|
| Receive audio | The radio's audio already comes to your browser as RemoteTx audio from the Audio tab. The FT8 tab listens to the same stream; no extra connection is made. |
| Decoder | The FT8/FT4 decoder is a high performance decoder, running on several threads in your browser. Decodes appear at the end of every 15 s (FT8) or 7.5 s (FT4) period. |
| Transmit audio | Your FT8 signal is generated in the browser and mixed into the outgoing RemoteTx audio in place of your microphone. The microphone is left out for as long as FT8 is transmitting or tuning. |
| TX / RX and frequency | The FT8 tab communicates with the Radio tab and sends TX, RX, and band selection VFO commands. This works for every radio type RemoteTx supports. |
| Logging | QSOs are kept in a log in your browser and can be exported as ADIF. With RTx EasyConnect linked, Decodes and QSOs can be sent to programs such as HRD Logbook, GridTracker, Log4OM or N1MM. See the FT8 tab as WSJT-X in Logging and loggers. |
Because the audio and control already go through RemoteTx, the FT8 tab works with the station exactly as it is set up for voice: the radio's USB audio at the Pi carries FT8 both ways.
What you need#
| Browser | Chrome or Edge on a PC or Mac is recommended. WebFt8 also works on phones and tablets. |
| Accurate clock | Your computer's clock must be within about ±1 second of UTC. FT8 doesn't work otherwise. |
| Radio connected | Connect the radio on the Radio tab first, with its audio running. |
| Radio mode | Put the radio in USB mode. |
Quick start#
- Connect your radio on the Radio tab as usual and make sure you hear it.
- Open the FT8 tab. The decoder loads the first time you open it (Loading FT8 decoder…).
- Click Settings. Under Station, enter your call sign and grid. The Audio and Radio tabs are already set for RemoteTx; leave them as they are. Click Done.
- Pick a Band. The radio tunes to that band's FT8 frequency.
- Click Start monitoring (or Monitor). Signals appear in the waterfall, and decodes appear in Band Activity at the end of each 15 s period.
- Set your transmit level: click Tune, and adjust Tx level in the top bar so the radio's power meter just reaches maximum while the ALC meter beside it stays green. Raising it further adds no power, only ALC. Click Tune again to stop. See Setting the level.
- To answer a CQ, double-click it in Band Activity. The QSO runs by itself with Auto Seq. See Making QSOs.
Keep the FT8 tab (or its pop-out window) visible while you transmit. Browsers slow down timers in tabs you can't see, which can make transmissions start late.