
Yaesu FT-710
The FT-710 is one of the simplest radios to run with RemoteTx. A single USB cable to the Raspberry Pi carries both CAT control and audio, and RemoteTx can turn the radio on and off remotely while it stays connected to its power supply.
Requirements#
| Item | Requirement |
|---|---|
| Radio firmware | MAIN V01-12 (02/29/24) or later. Download updates from the Files section of Yaesu's FT-710 product page. Yaesu FT-710 Product and Firmware Page |
| RemoteTx SD card image | v2.1.22 or later, from the RemoteTx Downloads page. The FT-710 then appears in the radio list. See Creating the RemoteTx SD card. |
| Cable | A USB cable from the FT-710's USB port to the Pi. |
| Raspberry Pi | Running above SD Card and with the Ethernet port plugged into an internet router (Wi-Fi can be set up later). |
Radio settings#
Set these on the FT-710 before you start. Everything else can stay at factory default; several of them can also be changed later from the RemoteTx radio page.
| Menu | Setting | Value | Why |
|---|---|---|---|
| Function → Operation Setting → General | CAT-1 Rate | 115200 bps | The most responsive interface. The default 38400 also works, but then select 38400 on the Setup tab too. |
| Function → Operation Setting → General | TX TIME OUT TIMER | 3 min | If USB control is ever lost, the radio stops transmitting by itself after 3 minutes (FCC Part 97.213). |
| Function → Operation Setting → General | SCU-LAN10 | ON | Lets RemoteTx read the radio's scope data for the Scope display. |
| Function → Radio Setting → Mode SSB | MOD SOURCE | USB | SSB transmit audio comes from the USB cable (the Pi). Can also be set from the radio page. |
If the Internet connection drops while you're transmitting, the Pi puts the radio back into receive within about a minute. The 3-minute TX time-out timer is the backstop if USB/CAT control itself fails.
Connecting the station#
- Connect the FT-710's USB port to a blue (USB 3.0) port on the Raspberry Pi.
- Copy your
remotetx.conffile to the top level of the Pi's SD card (see Creating the RemoteTx SD card), then connect the Pi's Ethernet port to your router with a network cable. - Power up the Pi. It takes about 3 minutes to start the first time, and may reboot a few times the first time. It gets an address from your router and connects to the RemoteTx service.
- Make sure the FT-710 has power. It doesn't need to be switched on: RemoteTx can turn it on and off.
Getting on the air#
- On a computer, phone or tablet, open Chrome or Safari at
https://<your-callsign>.remotetx.netand log in with your RemoteTx user name and password. - Allow the browser to use your microphone when asked.
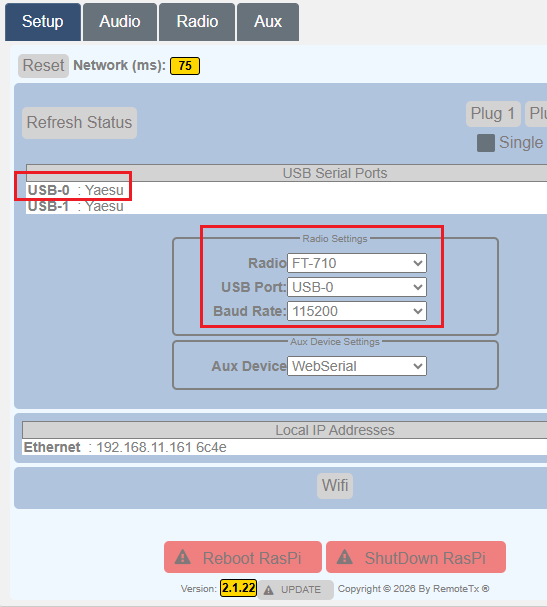
- On the Setup tab, choose FT-710, port USB-0, and baud rate 115200. The FT-710 shows two USB ports, USB-0 and USB-1; use USB-0.
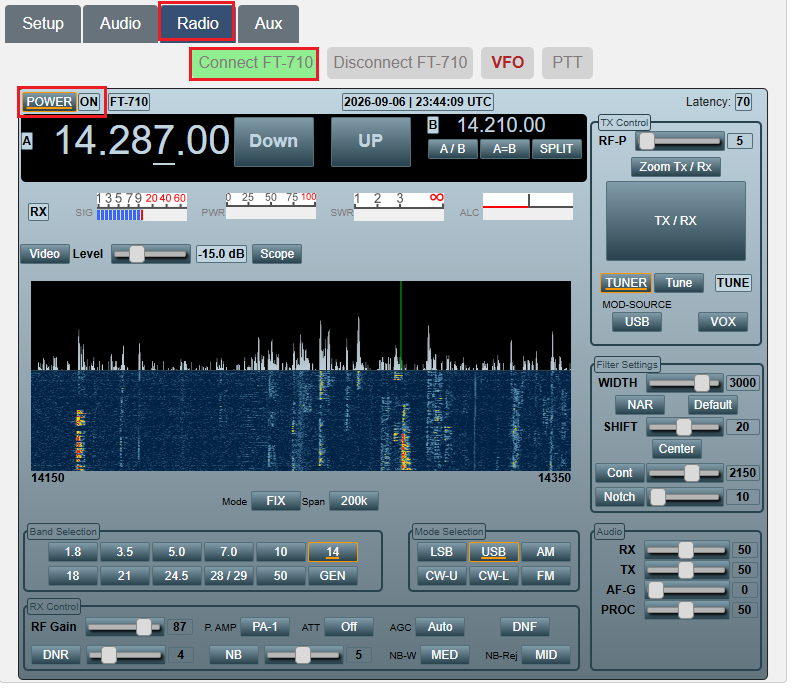
- On the Radio tab, click Connect FT-710. Working out the radio's status takes 5–10 seconds; the radio can be on or off.

- If the status shows OFF, click POWER. The radio takes a few seconds to start, then the controls come online.
- On the Audio tab, under Remote Audio, choose the USB Audio CODEC sound card and click the green Start/Restart Audio 1 button.
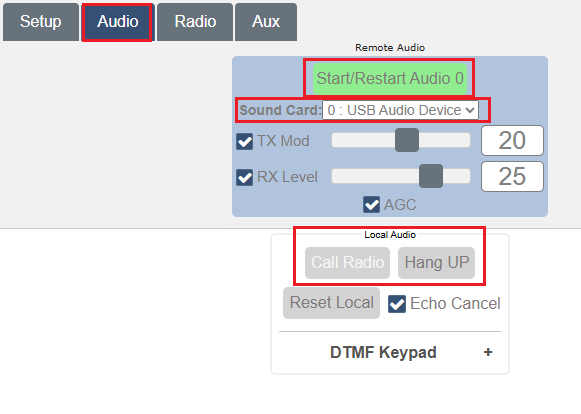
- After 5–10 seconds, Call Radio and Hang Up appear under Local Audio. The call usually starts by itself and you hear the radio. If not, click Call Radio.
- Make sure TX Mod and RX Level are ticked (with them off there's no audio in that direction). Start with TX/RX levels of 20 / 25 and adjust for your headset, computer or phone.
- Go back to the Radio tab and operate.
If the audio drops#
| Problem | Do this |
|---|---|
| The call didn't start | Click Hang Up and then click Call Radio. |
| Audio is broken up or stops | First click Reset Local to restart the audio in your browser. If there is still no audio, then Start/Restart Audio 0 to restart it on the Pi. This can take 5-10 seconds. |
| After an Internet outage at the station | The system tries to reconnect by itself. If audio stays down, click the green Start/Restart Audio 0 button first. |
The radio page#
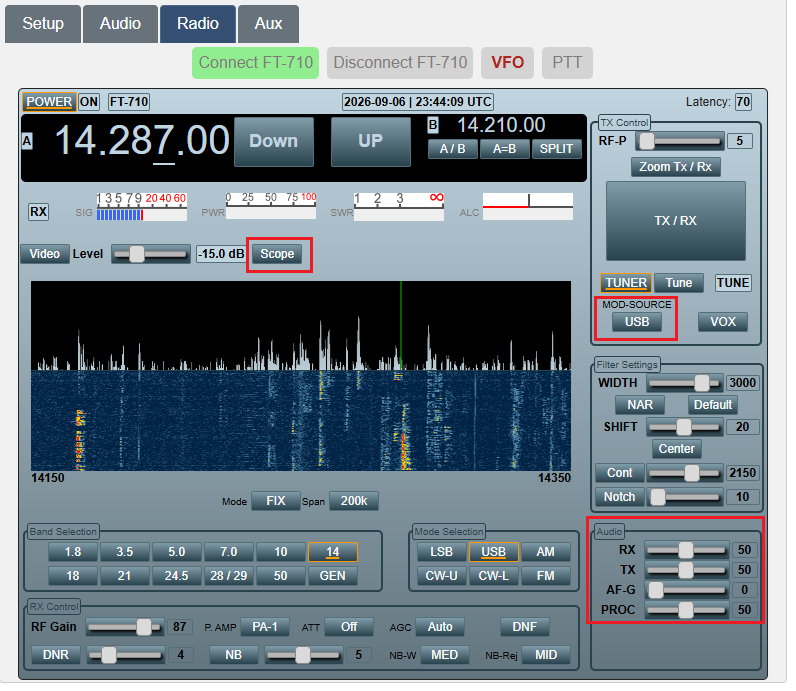
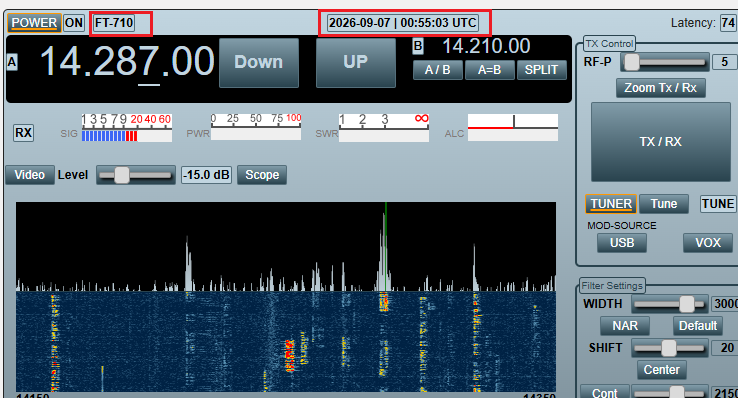
RemoteTx allows setting the most frequently used controls during typical operation. Buttons either toggle features on and off or cycle through available values. Slider controls allow setting variable values. Following are initial settings that are known to work well. They can be fine tuned to personal preference as experience is gained with the solution.
Typical starting settings#
| Control | Start with | Notes |
|---|---|---|
| MOD-SOURCE | USB | Transmit audio from the radio's USB sound card (the Pi). |
| Audio RX / TX | 50 | Adjust to taste. |
| AF-GAIN | 0 | Higher values also play the radio's speaker at the station. |
| PROC | 50 | Speech processor level for SSB. |
| Scope | On | Turn it off to save bandwidth; on a reliable 4G connection or better it can stay on. |
Disconnecting#
- On the Radio tab, click POWER if you want to turn the radio off (you can leave it on).
- Click Disconnect FT-710.
- On the Setup tab, click Logout and confirm.
- Close the browser.
Handy features#
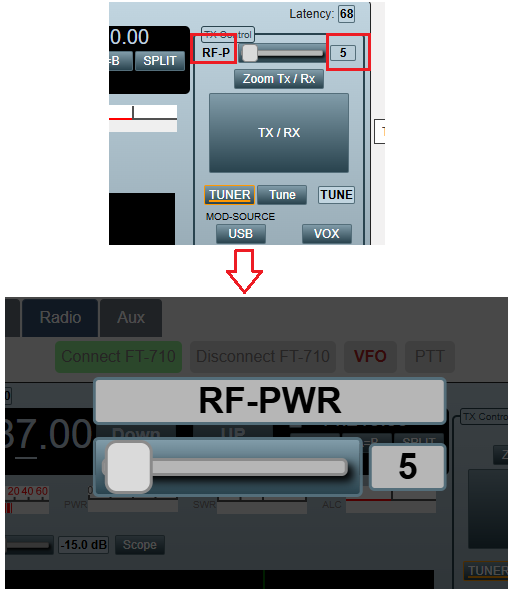
- Magnified sliders (phones and tablets): click a slider's name or value to enlarge it; click outside to put it back.
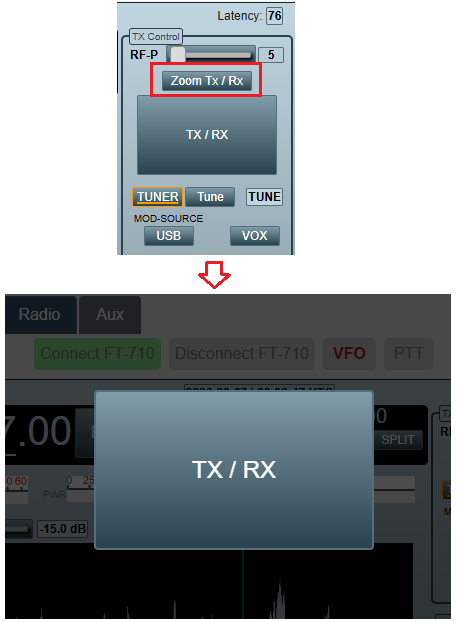
- Zoom Tx / Rx does the same for the TX/RX button.
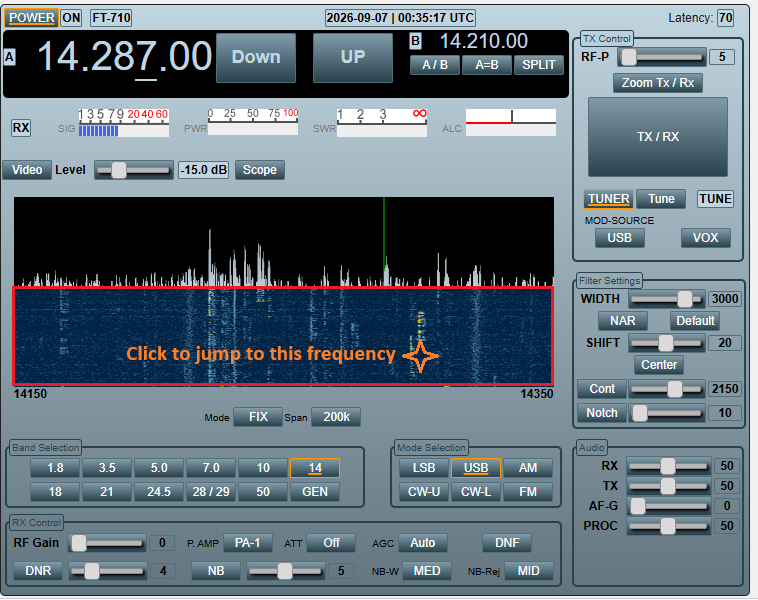
- Click-to-tune waterfall: click or tap anywhere on the waterfall to move the radio there.
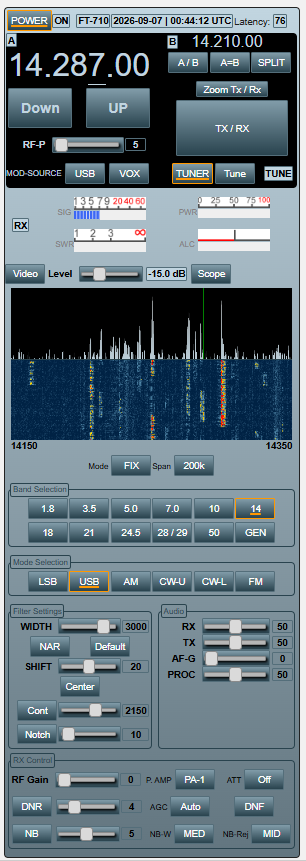
- Phone layout: on a phone the page rearranges itself; every control is still there.
- Click to Copy to Clipboard Info: click the FT-710 label or the time to copy the radio's status (UTC time, VFO A and B frequencies, mode, filter width) to the clipboard as JSON, for a log or a message.
Using the FT-710 with…#
| Feature | FT-710 notes |
|---|---|
| FT8 / FT4 | Works with the built-in FT8 tab: TX/RX and frequency go through the radio page. Use USB mode with MOD SOURCE = USB. |
| RTx EasyConnect | Supported. The VFO is polled once a second. |
| CW keyer | Paddle CW via audio with the USB-CW-VOX adapter on the KEY jack; set the radio's keyer to straight key with break-in on. |