The Icom 7300MKII has a USB-C port that allows both CI-V radio control as well as sound control. It also supports turning the radio on and off when power is continuously supplied to the radio. The MKII actually presents 2 serial ports via it’s USB port that appear as ACM-0 and ACM-1 most of the time on the RPi when you log in. Generally you want to connect to ACM-0, but with the new RemoteTx WebSerial feature, it is possible to directly connect a logging program such as N1MM+ via ACM-1.
Icom 7300MKII Preparation:
Generally you can connect to a Icom 7300MKII directly when it is in it’s factory default state without changing any settings.
There are several settings, though, that must be set up for the IC-7300 to work properly with RemoteTx for operating remotely.
- Menu -> SET -> Connectors -> USB AF/IF -> Output Select: AF
- Menu -> SET -> Connectors -> USB AF/IF -> AF Output Level: 50%
- Menu -> SET -> Connectors -> MOD INPUT -> USB MOD Level: 50%
- Menu -> SET -> Connectors -> MOD INPUT -> DATA OFF MOD: USB
- Menu -> SET -> Connectors -> USB (B) Function: CI-V
This allows you to use USB port ACM-2 as a WebSerial port to connect N1MM+ or WSJT-X etc. - Menu -> SET -> Connectors -> USB Send/Keying -> USB SEND: OFF
- Menu -> SET -> Connectors -> USB Send/Keying -> USB Keying (CW): OFF
- Menu -> SET -> Connectors -> USB Send/Keying -> USB Keying (RTTY): OFF
- Menu -> SET -> Connectors -> CI-V -> CI-V Baud Rate: Auto
- Menu -> SET -> Connectors -> CI-V -> CI-V Address: B6h
- Menu -> SET -> Connectors -> CI-V -> CI-V Transceive: ON
- Menu -> SET -> Connectors -> CI-V -> CI-V Output (for ANT): OFF
- Menu -> SET -> Connectors -> CI-V -> CI-V USB (A) Echo Back: OFF
- Menu -> SET -> Function -> Time-Out Timer (CI-V): 3min
In case all control is lost due to a USB malfunction, radio will stop transmitting after 3 minutes.
See FCC Part 97.213
If network connection is lost while transmitting, RemoteTx will automatically switch the radio back to Rx within a minute regardless of the above setting assuming there has not been a USB/CI-V control malfunction between the RPi and the radio. - Menu -> SET -> Connectors -> USB AF/IF Output -> AF Beep/Speech… Output: ON
This setting allows CW sidetone to be heard via the USB radio sound card. - Menu -> SET -> Connectors -> USB AF/IF Output -> AF SQL: ON
This setting makes the squelch control work properly when operating remote.
Setup procedure:
- Connect the usb-c port on the IC-7300MKII to any of the usb ports on the RPi with a USB cable.
- Plug the ethernet network port on the RPi into an Internet connected router with a cat5 network cable. (Wifi can be configured later once initial connection is established via ethernet.) Remember to copy the ‘remotetx.conf’ file to the ‘/’ folder of the RPi SDCard first.
- Apply power to the RPi so that it boots up. It should take about 1 to 2 minutes. During this time it will acquire a network address from the router and automatically connect via the Internet to the RemoteTx service.
- Make sure power is applied to the radio. (The radio does not have to be on. RemoteTx can turn it on and off.)
Remote Control:
- Using a PC, Mac, tablet or phone open a browser (Chrome or Safari) to https://your-callsign.remotetx.net
- At the login prompt, enter your RemoteTx username and password.
- Accept the prompt to allow the use of the microphone by the browser.
It is important that your device you has a working microphone or the audio will not start and you may not get the microphone prompt from the browser. - You may also be prompted to save your password. This is a good idea if you are using a device that you use often.
- The RemoteTx station control interface will appear showing the ‘Setup’ tab.
- Select Icom-Scope from the Radio menu, then choose 7300-MK2 from the CI-V Addr Menu.
(USB Port ACM-0 should automatically be selected.) - Click the upper ‘Radio’ tab and click on the ‘Connect Icon-Scope ‘ green button. This will initiate a control connection to the radio and show it’s current ‘Radio Status’. (It could be on or off.)
- If the ‘Radio Status’ is ‘OFF’ click the ‘Power’ button to bring the radio online and display its controls. (This can take a few seconds for the radio to start.)
- The radio control interface should now be online.
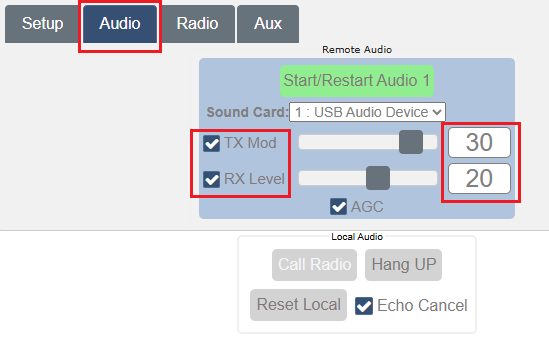
- Select the upper ‘Audio ‘ tab and in the ‘Remote Audio’ area select the ‘1: USB Audio Codec’ sound card choice.
- Click on ‘Start/Restart Audio 1’.
- Wait about 5 seconds after which the ‘Call Radio’ and ‘Hang Up ‘ buttons should appear in the ‘Local Audio’ area.
(If the Call Radio and Hang Up buttons do not appear, verify that you have a working microphone on your PC/Mac/Phone and that you have granted the browser you are using access permissions.) - Click on the ‘Call Radio’ button to initiate bi-directional audio to the radio. If audio becomes disrupted due to unreliable network conditions, clicking ‘Reset Local’ will re-initiate the browser audio and re-clicking the ‘Set Audio 1’ button will re-initiate the RasPi audio. (Normally re-clicking the ‘Set Audio 1’ button is only necessary if there has been an Internet disruption at the radio site.)
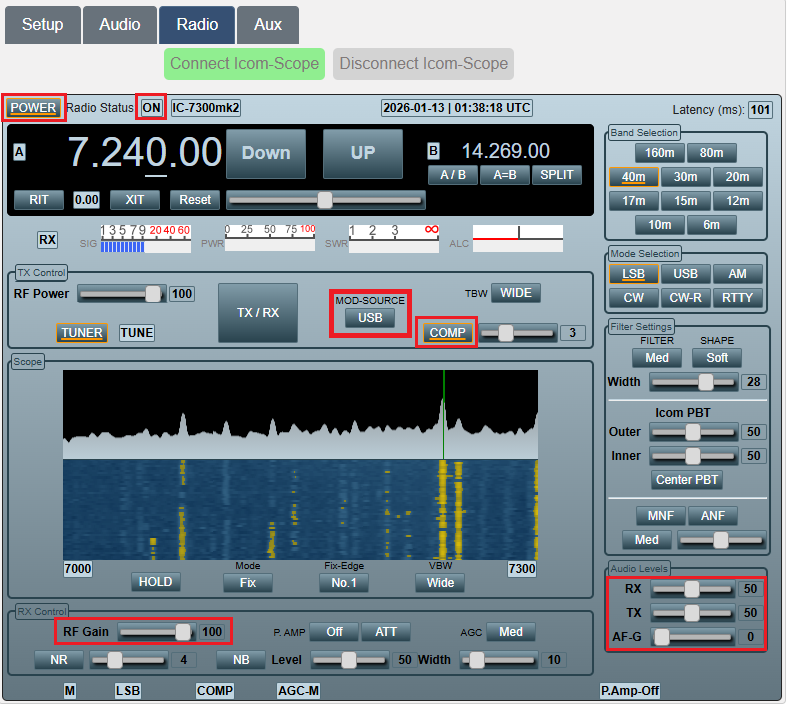
- Return to the upper ‘Radio’ tab to operate the radio.
Typical Radio Control Settings:
RemoteTx allows setting the most frequently used controls during typical operation. Buttons either toggle features on and off or cycle through available values. Slider controls allow setting variable values. Following are initial settings that are known to work well. They can be fine tuned to personal preference as experience is gained with the solution.
- Mod-Source: USB (This sets the Data Off Mod source to USB which is required for Tx.)
This is important, as otherwise you will not get any audio modulation from RemoteTx.
Switch this back to Mic, when you want to operate the directly with the Mic. - COMP: ON (Button will be Orange color, this is important)
- COMP LEVEL: 3
- RF-GAIN: 100 or as preferred
- USB-TX: 50
- USB-RX: 50
- AF-GAIN: Has no effect so leave at 0. If it is above 0, the radio speaker will be heard at the station location.
- Initially set the Audio Tab settings as below and then adjust them to your particular taste and headset equipment.
The rest of the controls are self explanatory to an operator experienced with the Icom 7300MKII.
If you are using a Mac or PC with a mouse that has a roller button, the roller can be used to change the values of controls that the mouse is hovering over. This includes the individual frequency digits and slider controls.
Disconnecting from Radio:
Release control of the radio in this order.
- Select upper ‘Radio’ tab.
- Click the ‘Power’ button to turn the radio off if this is desired (it can also be left on, ready for the next connection).
- Click the ‘Disconnect Icom-Scope’ to release remote control of the radio.
- Click the Setup tab, then click the Logout button and click yes when prompted to logout.
- Close the browser to disconnect from the RPi.